I was excited to feature this guest post because for my sister’s baby shower she had each person make a hand-made onesie for the new baby. She had some people do newborn size, other decorated 3 – 6 months and others 6-9 months up to a year so that the baby had a first year’s worth of something custom and meaningful. I really LOVE this idea. Would you like to make these at a baby shower you may be planning? Or how about making them for your own baby? This is a great tutorial for making Hand Printed onseies – dont forget to visit the blogs for more outstanding photos and ideas.
Hand Printed Onesies
Every fashion-conscious baby knows that the coolest item of clothing in your wardrobe has to be a unique hand-printed onesie. As a parent, it’s your duty to ensure your buddle of joy is dressed to impress and a one-off piece for their wardrobe is a must-have. Seriously though, hand-printed onesies are a lot easier than you think and even you (yes, you!) can knock one up for your stylish baby or make a thoughtful, unique gift for a friend. Here’s how you can go from mum-to-be to fashion designer du jour.
There are a ton of tutorials online and we were super impressed by the efforts of Bloggers Cassandra at Diesel in Bloom and Sally atShim & Sons.

All you’ll need to create your very own hand printed onesie is:
A onesie (or a t shirt) – you can pick these up for a relatively low price but check the quality, you don’t want one that can only go through the wash twice!
Fabric paint – there are plenty of colours available, check out craft websites or local stores for crafting products.
Stencils
Sponges
Brushes
Masking tape
Step 1
To start with, wash and iron your blank onesie and lay it flat. Slide a piece of card inside the onesie to protect the fabric on the back and inside.
Step 2
You can adapt this stage to fit your own personal design – if you want an easy life then using a stencil is a good idea. You can buy stencils from most craft shops but if you have a particular idea in mind and you don’t trust yourself to draw freehand just make your own stencil. Print an image out onto thick paper or card and cut out the design, if you make your own stencil you’ll only be able to use it once.
Step 3
Fix your stencil onto the front of your onesie, use masking tape to hold it in place. If you aren’t using a stencil you can even use masking tape to mark out your pattern.
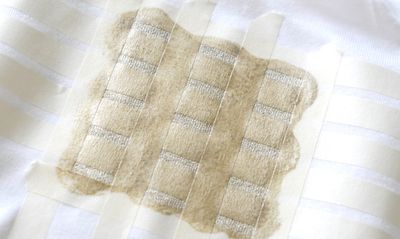
Step 4
When your stencil is attached use your sponge to apply the fabric paint, a little at a time – you don’t need to overload the paint! If you use too much paint it may seep underneath your stencil, take care with the corners – use a paintbrush for the tricky bits. If you are feeling adventurous why not use a few different colours?
Step 5
Peel off your stencil carefully and touch up any missing spots with your paintbrush. Leave your onesie to dry for an hour or so.
Step 6
Pop a tea towel over your dry design and iron over the top on a low heat to fix the patter. Voila!
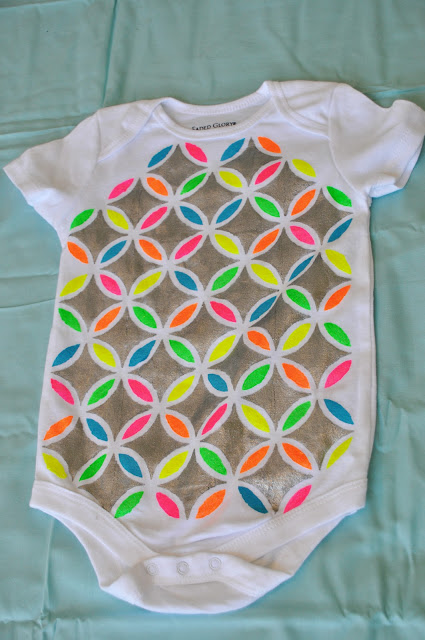
So, there you have it – the perfect gift for a beautiful, bouncing baby!
Heavenly Savings
These are absolutely adorable!! I will for sure be coming back and making some of these for all the babies I know that will soon be born! Thanks!!!
Naptime Review
That is adorable! I wish my 1 year old still was in onesies…
Julie @ Naptime Review
Stopping by from Review Bloggers Unite 🙂
http://www.thenaptimereview.com
Kat Hoar
This looks so easy, Also a great way to make a personalized gift or do something great for your own child. Thank you so much.
Stephanie @ One Sleepy Mom
Those are adorable! I bet you could do the same for any outfit…uh oh I feel a trip to the craft store coming on!
BargainHoundDailyDeals
I love this!! We are expecting a baby in our family very soon so this was perfect timing! Thank you!
Sam Buck
These are too cute! Would make a perfect shower gift…personalized and special. 🙂
Maria Long
Amazing. Now I need a friend to have a baby so I can test it out. Thanks for the tutorial
Maria Long
Amazing. Now I need a friend to have a baby so I can test it out. Thanks for the tutorial
pattersonchick
So cute! Ill have to do this for the 7 month old that I baby sit